Detecting memory leaks in Visual Test unit tests
Introduction
We recently had a request asking if Memory Validator could detect memory leaks in unit tests managed by Microsoft’s Visual Test and Visual Test Explorer. They told us what they’d tried to do and that it had failed. Our response was to find out what was failing, fix it and then describe what you need to do to use our tools with Visual Test. That’s what this article is about.
There were a few bugs specific to working with Visual Test, plus a very novel environment variable data corruption that can only happen in very unusual circumstances (you almost certainly would not hit these in normal usage of our tools). We fixed these tools, and then experimented with several ways of working with Visual Test. We’re only going to talk about Memory Validator here, but this article also applies to our Coverage, Performance and Thread tools.
You can run Visual Test from the command line, and also via Visual Test Explorer, which is a component of Visual Studio.
Monitoring Visual Test from the command line
The full details of how to work with Visual Test from the command line are documented in this article from Microsoft.
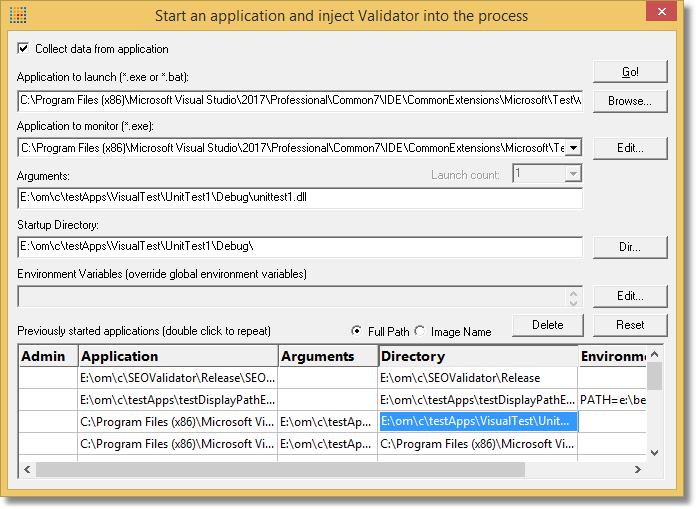
Using this information we know that we need to launch vstest.console.exe and pass the unit test DLL to that as an argument. For example:
vstest.console.exe unitTest.dll
Using this information we can launch vstest.console.exe from Memory Validator and pass it to the appropriate DLL. You can set the startup directory to whatever you like. We’ve chosen to set it to the same directory as the unit test DLL.
Unit Test Code
namespace UnitTest1
{
	TEST_CLASS(UnitTest1)
	{
	public:

		TEST_METHOD(TestMethod1)
		{
			// pretend this is a real unit test,
			// exercising a real target class/function
			// and that it leaks some memory

			char *ptr;

			ptr = new char[123];
			strcpy_s(ptr, 123, "Excellent Adventure");

			ptr = (char *)malloc(456);
			strcpy_s(ptr, 456, "Bogus Journey");

			ptr = (char *)malloc(789);
			strcpy_s(ptr, 789, "Face the Music");

			Assert::AreNotEqual("Bill", "Ted");
		}

	};
}
You’ll notice that you don’t need to specify the TEST_MODULE_INITIALIZE(moduleInit) function, or the TEST_MODULE_CLEANUP(moduleCleanup) function. You only need to specify the unit tests you want to be tested. Memory Validator does the rest.
Monitoring Visual Test Explorer
When working with Visual Test Explorer, Visual Test is launched from Dev Studio, and then loads the unit tests for testing from a DLL. Visual Test then stays running in the background and does not shut down. This means the “program has ended” signal that Memory Validator needs doesn’t get sent. It also means that subsequent tests run with Visual Test Explorer won’t cause Visual Test to startup, meaning that the “program has started” signal that Memory Validator needs doesn’t get sent.
To get around these problems we need to use the NT Service API (see help file, or online documentation for details) to contact Memory Validator at the start of the unit tests, and also at the end of the unit tests. We do that using the TEST_MODULE_INITIALIZE(moduleInit) function, or the TEST_MODULE_CLEANUP(moduleCleanup) functions.
Functions
We use svlMVStub_LoadMemoryValidator() to load Memory Validator into the unit test, then svlMVStub_StartMemoryValidator() to start it monitoring the unit test and communicating with the user interface. At the end of the tests, we use svlMVStub_UnloadMemoryValidatorAndTerminateProcess(1000) to shutdown Memory Validator and set a thread running that will after a delay of 1000ms terminate the vstest.executionengine.x86.exe (Visual Test) process. You may need to experiment with this delay on your machine.
Header Files
We need to include two header files from Memory Validator. svlMVStubService.h and svlServiceError.h. You’ll find these in the svlMVStubService folder in the Memory Validator install directory.
Libraries
We also need to link to svlMVStubService.lib (32-bit builds) or svlMVStubService_x64.lib (64-bit builds). You’ll find versions of these libraries in the svlMVStubService folder (one library per version of Visual Studio).
Unit Test Code
#include "svlMVStubService.h"
#include "svlServiceError.h"

namespace UnitTest1
{
	TEST_MODULE_INITIALIZE(moduleInit)
	{
		SVL_SERVICE_ERROR	sse;

		sse = svlMVStub_LoadMemoryValidator();

		sse = svlMVStub_StartMemoryValidator();
	}

	TEST_MODULE_CLEANUP(moduleCleanup)
	{
		SVL_SERVICE_ERROR	sse;

		sse = svlMVStub_UnloadMemoryValidatorAndTerminateProcess(1000);
	}

	TEST_CLASS(UnitTest1)
	{
	public:

		TEST_METHOD(TestMethod1)
		{
			// pretend this is a real unit test,
			// exercising a real target class/function
			// and that it leaks some memory

			char *ptr;

			ptr = new char[123];
			strcpy_s(ptr, 123, "Excellent Adventure");

			ptr = (char *)malloc(456);
			strcpy_s(ptr, 456, "Bogus Journey");

			ptr = (char *)malloc(789);
			strcpy_s(ptr, 789, "Face the Music");

			Assert::AreNotEqual("Bill", "Ted");
		}

	};
}
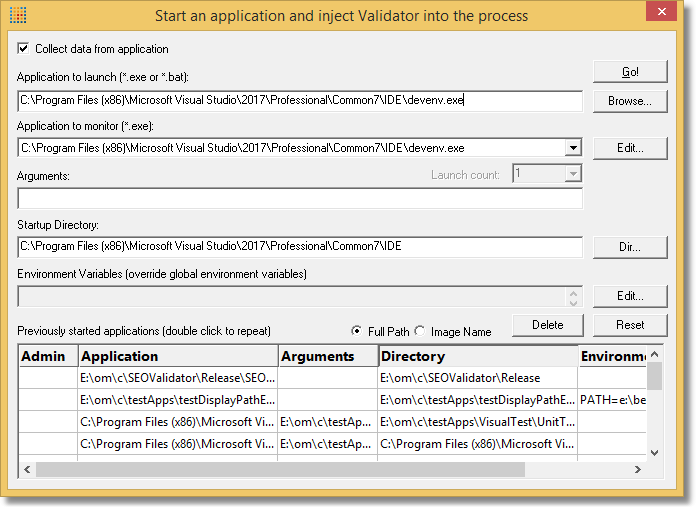
Having reworked the unit tests to support the NT Service API, we now need to launch devenv.exe from Memory Validator, but with instructions to ignore devenv.exe and monitor Visual Test (vstest.executionengine.x86.exe). We do that from the launch dialog/wizard.
- First choose devenv.exe to monitor using the Browse… button next to the Application to launch field.
In this example we chose C:\Program Files (x86)\Microsoft Visual Studio\2017\Professional\Common7\IDE\devenv.exe
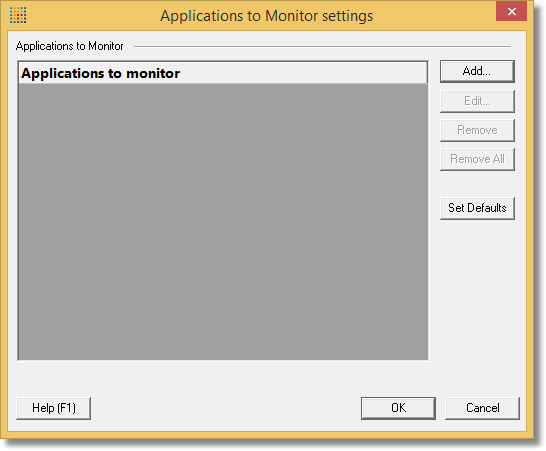
- Next, we need to set up the applications to monitor.
Click the Edit… button next to the Application to monitor field. The applications to monitor dialog is displayed.
- Choose devenv.exe using the Browse… button next to the Application to launch field.
- Click the Add… button and add the vstest.executionenginex86.exe that corresponds with the devenv.exe you selected.
In this example we chose C:\Program Files (x86)\Microsoft Visual Studio\2017\Professional\Common7\IDE\CommonExtensions\Microsoft\TestWindow\vstestexecutionengine.x86.exe.
Be sure to choose the correct one – there are several with similar names to choose from.
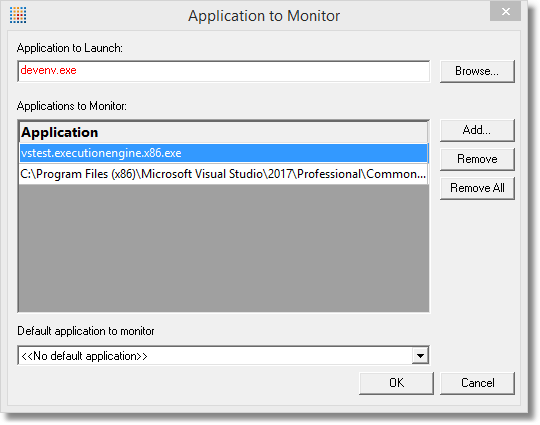
- Click OK to accept the application to monitor.
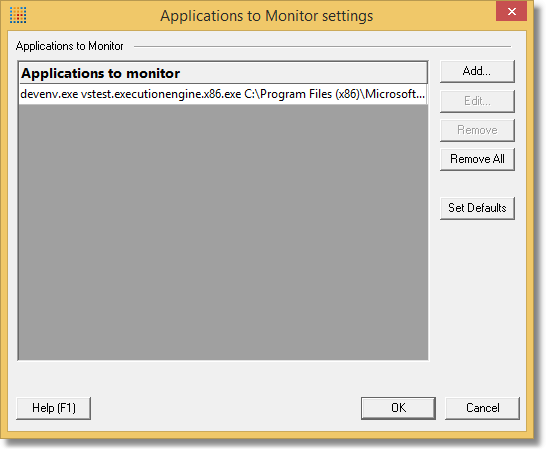
- Click OK to accept the new definitions.
- Now on the launch dialog, change the Application to monitor combo to select the vstest.execution.x86.exe entry.
- Enter the name of your unit test dll(s) in the Arguments field, separated by spaces. If you specify the directory containing the DLLs as the startup directory, you can specify the DLL names without paths.
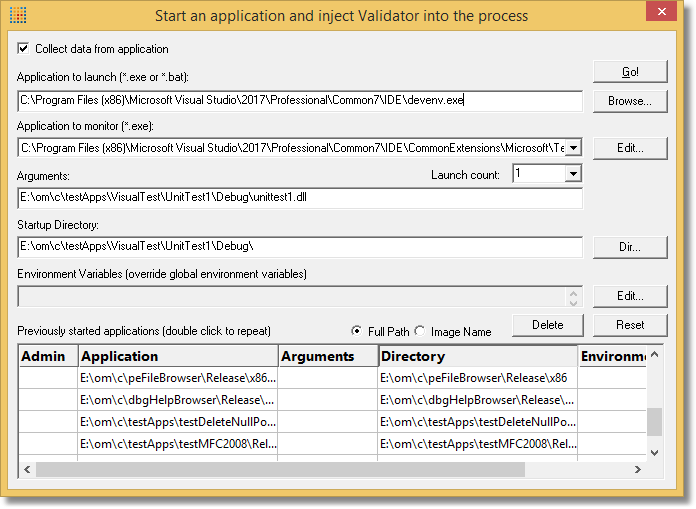
- To start devenv, click the Go! button. Devenv will start.
- Load the solution that contains your unit tests.
- When you choose Run Selected Tests or Debug Selected Tests from Visual Test Explorer, the tests will run and will be monitored by Memory Validator at the same time.
Running Your Tests
Now that we’ve set up Memory Validator to monitor Visual Test when started from devenv, let’s get to work.